CodeIgniter’s File Uploading Class allows uploading files on the server. You can upload single file or image easily using Upload library. But sometimes multiple file uploading feature needs to be provided the in the web application. This article will help to upload multiple file and image at once using CodeIgniter’s Upload Library. Also, we’ll show you how to insert the uploaded file information into the database.
Here you can get the simple script to upload multiple files in CodeIgniter. If you’re looking for the multiple files upload feature in PHP, you can see the following resource.
- Drag and drop file upload using DropzoneJS and PHP
- Upload multiple images using jQuery, Ajax and PHP
In the example script, we’ll display a file uploading form where the user can able to choose multiple files at once. Once upload button is clicked, all the files or images would be uploaded to the specified folder and the file information would be inserted into the database table.
Database Table Creation
Create a table called files to store the file information in the database (codeigniter_db). The table creation SQL would something like the below.
CREATE TABLE `files` (
 `id` int(11) NOT NULL AUTO_INCREMENT,
 `file_name` varchar(255) COLLATE utf8_unicode_ci NOT NULL,
 `created` datetime NOT NULL COMMENT 'Upload Date',
 `modified` datetime NOT NULL,
 `status` tinyint(1) NOT NULL DEFAULT '1' COMMENT '1=Unblock, 0=Block',
 PRIMARY KEY (`id`)
) ENGINE=InnoDB DEFAULT CHARSET=utf8 COLLATE=utf8_unicode_ci;
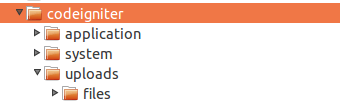
Upload Folder Creation
Create a directory on the server where you want to store the uploaded files. For example, create a uploads/files/ directory in the root folder of the application.
Controller (Upload_files.php)
__construct() : In this function, we’ll load the File model which will help to get file information from the database and insert files information in the database.
index() : This function displays all the images which are already uploaded. On submitting the upload form, files would be uploaded to the specified folder using Upload library and insert the files data into the database using File model.
<?php defined('BASEPATH') OR exit('No direct script access allowed');
class Upload_Files extends CI_Controller
{
    function  __construct() {
        parent::__construct();
        $this->load->model('file');
    }

    function index(){
        $data = array();
        if($this->input->post('fileSubmit') && !empty($_FILES['userFiles']['name'])){
            $filesCount = count($_FILES['userFiles']['name']);
            for($i = 0; $i < $filesCount; $i++){
                $_FILES['userFile']['name'] = $_FILES['userFiles']['name'][$i];
                $_FILES['userFile']['type'] = $_FILES['userFiles']['type'][$i];
                $_FILES['userFile']['tmp_name'] = $_FILES['userFiles']['tmp_name'][$i];
                $_FILES['userFile']['error'] = $_FILES['userFiles']['error'][$i];
                $_FILES['userFile']['size'] = $_FILES['userFiles']['size'][$i];

                $uploadPath = 'uploads/files/';
                $config['upload_path'] = $uploadPath;
                $config['allowed_types'] = 'gif|jpg|png';

                $this->load->library('upload', $config);
                $this->upload->initialize($config);
                if($this->upload->do_upload('userFile')){
                    $fileData = $this->upload->data();
                    $uploadData[$i]['file_name'] = $fileData['file_name'];
                    $uploadData[$i]['created'] = date("Y-m-d H:i:s");
                    $uploadData[$i]['modified'] = date("Y-m-d H:i:s");
                }
            }

            if(!empty($uploadData)){
                //Insert file information into the database
                $insert = $this->file->insert($uploadData);
                $statusMsg = $insert?'Files uploaded successfully.':'Some problem occurred, please try again.';
                $this->session->set_flashdata('statusMsg',$statusMsg);
            }
        }
        //Get files data from database
        $data['files'] = $this->file->getRows();
        //Pass the files data to view
        $this->load->view('upload_files/index', $data);
    }

}
We’ve set basic preferences in Upload library ($config), you can set various preferences provided by the Upload library. Complete preferences list can get from here – https://ellislab.com/codeigniter/user-guide/libraries/file_uploading.html
Model (File.php)
File model consists of two functions getRows() and insert(). getRows() function is used to fetch the file information from the database and return it as an array. insert() function used to insert the provided file information into the database.
<?php if ( ! defined('BASEPATH')) exit('No direct script access allowed');
class File extends CI_Model{

    public function getRows($id = ''){
        $this->db->select('id,file_name,created');
        $this->db->from('files');
        if($id){
            $this->db->where('id',$id);
            $query = $this->db->get();
            $result = $query->row_array();
        }else{
            $this->db->order_by('created','desc');
            $query = $this->db->get();
            $result = $query->result_array();
        }
        return !empty($result)?$result:false;
    }

    public function insert($data = array()){
        $insert = $this->db->insert_batch('files',$data);
        return $insert?true:false;
    }

}
View (upload_files/index.php)
In the view file, we’ll display the HTML upload form with file input and a submit button. Under the file uploading form, all the uploaded images would be displayed.
<div class="container">
    <div class="row">
        <p><?php echo $this->session->flashdata('statusMsg'); ?></p>
        <form enctype="multipart/form-data" action="" method="post">
            <div class="form-group">
                <label>Choose Files</label>
                <input type="file" class="form-control" name="userFiles[]" multiple/>
            </div>
            <div class="form-group">
                <input class="form-control" type="submit" name="fileSubmit" value="UPLOAD"/>
            </div>
        </form>
    </div>
    <div class="row">
        <ul class="gallery">
            <?php if(!empty($files)): foreach($files as $file): ?>
            <li class="item">
                <img src="<?php echo base_url('uploads/files/'.$file['file_name']); ?>" alt="" >
                <p>Uploaded On <?php echo date("j M Y",strtotime($file['created'])); ?></p>
            </li>
            <?php endforeach; else: ?>
            <p>Image(s) not found.....</p>
            <?php endif; ?>
        </ul>
    </div>
</div>
Config (autoload.php)
You need to load some system library and helper for this example script. Open the config/autoload.php file and specify the library (session,database) and helper (url) which are used in the application.
$autoload['libraries'] = array('session','database');

$autoload['helper'] = array('url');
By accessing the index method of the Upload_Files controller (http://localhost/codeigniter/upload_files) on the browser, file uploading form and uploaded files will display like the below screen.

Conclusion
In this example script, we demonstrate the multiple images upload process. However, you can use this script to upload all types of file. You only need to set the allowed_types preference in Upload library. To accept all types of file upload set the following preference in CodeIgniter File Upload class.
$config['allowed_types'] = '*';
Thank you so much admin. This post helps me a lot
hey i got solution i was make mistake in routes now its working fine thanks alot